Thursday, January 21, 2010
Fender Media's latest custom car
Fender Media's latest custom car project is this '69 Chevy El Camino. This is part 1 of a series covering the restoration and customization of this muscle car. This time we'll revamp the suspension...
Wednesday, January 20, 2010
The Other C10
I've got a serious weakness for Chevy trucks, especially the old ones. In addition to the '67, I also own a '73 shortbed C10 that I drive every day. During one of my recent road trips, I stopped in Texas so visit my friend Cory. Cory owns Kustomwerx Autobody and during the course of a four day layover in Conroe, he and his crew replaced a bed side and doors, and fixed rust, dents, and a ton of dings. This left just enough time to spray a quickie single-stage coat of blue on the body. I was so stoked when I hit the road in the C10 because it went from being brown, white, tan, and rust-colored to a flat metallic blue paintjob.
The truck looked great until I got home and adopted a dog. Bella, a Springer Spaniel with a serious case of separation anxiety, clawed the hell out of my C10 the first time I left her alone in the garage with my C10. I can only surmise that she recognized the truck as a safe place to hide until I returned home because she tried to claw her way into the cab from every angle. The doors, bed, and hood all had deep scratches that I couldn't buff out because of the flat color of paint on the truck.
So the truck went back to Wetworks Autobody in Costa Mesa for a repaint. Thank god for car insurance! While it was in the shop (again!), Marcel and I seized the opportunity to give the truck a color change, fix a few dents, and shave a few more holes. We saved a few bucks by gutting the interior, removing the bed, and performing the welding ourselves.
The dash, A- and B-pillars, and rear cab wall never got painted the first time so Marcel and I sanded all of these areas in preparation for a new coat of 2010 Ford Grabber Blue paint.


While the shop was getting the body straighter and scratch-free, Marcel and I shaved the hood emblem mounting holes.


When we left Wetworks yesterday the body was just about ready for a coat of sealer. We'll check back in a few days and report on the progress. I'm anxious to get the truck back before my mother-in-law repos her truck that I've been borrowing!
-Mike
Sunday, January 17, 2010
Joe's Elco: Part 3
Our third day in Clovis was very productive. We wrapped up the rear suspension install, picked up new wheels, and started in on the rusty front suspension. Like the rear, the bushings and balljoints were shot. Getting the bushings out of the lower control arms required the noisiest tool on earth-the air chisel!


The stock lower arms didn't go back onto the car until we cleaned and painted the surrounding chassis area.

The stock upper arms were not reused. Instead, we assembled a pair of McGaughy's tubular control arms with urethane bushings.


One part that we didn't replace, and which would later bite us in the ass, were the stock front coil springs. We blasted them clean and repainted them black before putting them back into service.

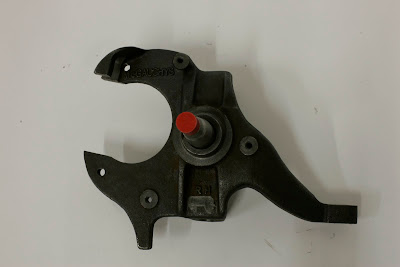
The reason for keeping the stock springs was that we were going to drop Joe's Elco two-inches up front with these McGauhy's drop spindles.


Amazingly, Joe's Elco still had its original shocks up front. While this car was comfy because it literally felt like it was floating down the road. You could hit a railroad crossing at full-speed without feeling it. While that was cool, when you had to slow down to a crawl to take a corner, the car felt like it was going to end up on its lid. It leaned enough that you could reach out the window and damn near touch the ground. New dampers would help.

The steering was, to put it mildy, deadly. It was mushy, it had about 45-degrees of play in the wheel, it was like driving a 1955 Cadillac. A new quick-ratio steering box from ABS was called to action to cure many of the steering system's ills.

The final piece of the handling puzzle was the addition of another Hellwig anti-sway bar up front.

You might have noticed the disc brake attached to that new spindle. That 11-inch rotor is part of a system that replaces the factory drum brakes.


The factory manual brake master cylinder wasn't going to cut it with the new brakes so we picked up another cool part from ABS. This 11-inch booster will work even with a mild camshaft inside of the engine and minimal vacuum.


The factory brake lines needed to be uncoiled and relocated. When we tried to move them they were so brittle that they began to crack. So, Shane cut them off, flared new ends in place and bent up his own lines to make the installation cleaner. It was easier to leave the factory proportioning valve in place on the framerail and remove the aftermarket one from the booster as well.

Now for the fun part. We threw the stock 14-inch wheels and cracked tires into the trash. We replaced the tires with BF Goodrich Gforce TA KDWS


How do the new tires look inside the fenders of Joe's Elco? Well, when we stuffed a new set of 17-inch Wheel Vintiques 68 Series chrome rally wheels inside of them and then set the car on the ground, this is what we saw.


The front end sits a bit too low (remember the stock front springs I spoke of earlier?) and that left front tire rubs the inner fender over bumps and when cornering hard. We'll need to install a new set of stock-length springs before we do any more hard driving. The drive home from Clovis was made in record time (for Joe's El Camino!) thanks to brakes that worked and steering that actually inspired confidence in the fact that when you turned the wheel left, the car would indeed go left. Except for the tire rubbing, Joe's Elco is now a dream to drive. It corners flat, stops quick, and tracks tracks straight. It doesn't float down the highway any longer but it also doesn't have the harsh ride characteristics of a sports car. It's damn near perfect now. It's too bad the motor was smoking worse than ever when we got home. We'll have to address that before we do any more driving in Joe's Elco.
Saturday, January 16, 2010
Joe's Elco: Part 2
We arrived in Clovis at PPC Customs shortly after the shop opened. Shane and Richard wasted no time hoisting Joe's Elco up into the air and gutting the rear suspension, which looked like it had gone untouched since Nixon resigned.

The car originally came equipped with factory air shocks. The air dampers were still intact, although the original steel air lines were not. The spiders seemed to particularly enjoy nesting here.

Our goal for the rear suspension was a lofty one: lower the car just one inch while still improving the ride quality and handling. These lower control arms from McGaughy's solved several problems, including replacing severely worn out factory rubber bushings.


As much as we dig air shocks, we knew that these gas-charged dampers from Belltech would yield better conrol over the El Camino's suspension.

Although our new coil springs look much shorter than the stockers, they will still only lower the car one inch, thanks to a more aggressive spring rate.

We opted to add a beefy anti-sway bar from Hellwig to help keep the Elco flat in the corners.

Although we had not intended to do any resto work to the car during our brief visit to PPC Customs, we all agreed that installing fresh new parts onto the rusty chassis was like putting lipstick on a pig. Pride simply wouldn't allow the car to leave the shop without a thorough cleaning. So, out came the 10-bolt axle and off to the do-it-yo-damn-self carwash we went!

Once we degreased the rearend and rear of the chassis using KBS Coatings Aqua Clean, we painted everything satin black. The new parts looked right at home once the car was clean. Take a look at McGaughy's adjustable upper control arms. These will allow us to lower the car and adjust the rear pinion angle for max traction and proper alignment of the driveline.

Hellwig's anti-sway bar attached to the axle using u-bolts and another set of brackets attached to the chassis using existing holes. Its a pretty slick arrangement and was super easy to install.

Here's a look at the completed rear suspension. The rearend is still rockin' the factor drum brakes, which suck balls. We'll address that nuisance later on. For now, enjoy the visual of a clean rear suspension and fat BFG tires!

Next time, we'll check out the front suspension mods, new wheels, and then give you the money shot: the car rolling again!
-Mike
Friday, January 15, 2010
Joe's Elco: '69 Chevy El Camino
I'm taking a break from the updates on the '67 C10 because Marcel and I took a road trip this week. We drove from Orange, CA to Clovis, CA to visit our friend Richard at PPC Customs. We invaded his shop for a few days to work on Joe's Elco.
Joe's Elco is a project that I recently inherited. My wife's grandfather, Joe, was the original owner. When he passed away, the car went to her dad, who was also named Joe, hence the name of the car. Dad left us this summer and after a small amount of consternation among the family, we took the car home to fix it up. I wanted to make sure this car was put back into good shape so that the family could enjoy it for years to come.
The Elco hadn't recieved much in the way of maintenance during the last decade so although it looked pretty good, it needed a lot of help. The list of weak points included the brakes, steering, suspension, interior, engine, paint and body-pretty much the whole car.


But, back to our little road trip. The plan was to kill several birds with one well-placed stone. Marcel was going to tow his '56 Chevy to Whipple Superchargers to have the blown 407ci V-8 dyno-tested. I was going to drive the Elco to PPC Customs for some preventative maintenance. Mainly, I wanted to prevent death due to weak brakes and sketchy handling for myself or any other family member that got behind the wheel of Joe's Elco. Both shops are near each other so a convoy northward was in order.
So, at 4am in the morning, we hit the road cruising at a whopping 60 mph. The Elco seemed to be OK with our pace, but we stopped twice to add oil anyway.


Joe's Elco is a project that I recently inherited. My wife's grandfather, Joe, was the original owner. When he passed away, the car went to her dad, who was also named Joe, hence the name of the car. Dad left us this summer and after a small amount of consternation among the family, we took the car home to fix it up. I wanted to make sure this car was put back into good shape so that the family could enjoy it for years to come.
The Elco hadn't recieved much in the way of maintenance during the last decade so although it looked pretty good, it needed a lot of help. The list of weak points included the brakes, steering, suspension, interior, engine, paint and body-pretty much the whole car.

When the day arrived to tow the Elco home, it barely moved under its own power. The trans, rear differential, brakes and engine were all dangerously low on vital fluids because of various leaks.

On the bright side, this car should be easy to fix-up since aftermarket parts are readily available thanks to the an automotive family tree that shares a branch with the Chevelle. Also, with the exception of a small amount of body rot in the floor of the cab and rear lower quarter panels, the body is in suprisingly great shape for a 41-year-old car.


When we topped off all of the fluids, the car did run, but the engine smoked so bad that I swear I saw the EPA tailing me in an unmarked van as I cruised the neighborhood. I remember my father-in-law telling me once that the original timing chain had broke and although he did replace it, he never got around to rebuilding the engine. Time has a funny way of keeping us from doing what we really want to do. I know he wanted to hot rod that small-block but he never got around to it.
I can only assumed that a few valves met the pistons when the timing chain broke and the valve guides and seals are likely trashed. The odometer shows under 90,000 miles but it's probably flipped over at least once and the piston rings are probably shot as well. She's tired and needs a rebuild or replacement power plant. I've got something very cool in mind to put more pep in her step.

But, back to our little road trip. The plan was to kill several birds with one well-placed stone. Marcel was going to tow his '56 Chevy to Whipple Superchargers to have the blown 407ci V-8 dyno-tested. I was going to drive the Elco to PPC Customs for some preventative maintenance. Mainly, I wanted to prevent death due to weak brakes and sketchy handling for myself or any other family member that got behind the wheel of Joe's Elco. Both shops are near each other so a convoy northward was in order.
So, at 4am in the morning, we hit the road cruising at a whopping 60 mph. The Elco seemed to be OK with our pace, but we stopped twice to add oil anyway.
Near the I-5 and Highway 99 interchange, inTulare, there is an excellent roadside spot to check out a vintage bomber and fighter jet as well as take a leak.


That's me adding more dino oil to the hungry engine while "Vegi-Dan" works the camcorder. We filmed the whole trip so at some point when we get around to it, there will be some cool video here to check out. I wearing that beanie for two reasons: first off, the Elco has holes in the floorboards right above the leaky exhaust system. Second, I had to drive with the windows down to keep from passing out from the carbon monoxide fumes and it was barely 40 degrees out. I froze my giblets off during the trip but boy was it fun!

Stay tuned for part two of the trip! Oh and for those of you waiting with baited breath for Marcel to actually write a blog, I'll kick him in the ass next time we are in the garage to put some pics up of his awesome '56. Later!
-Mike
Subscribe to:
Posts (Atom)